Brake Pad Measuring Tool: Types, Readings, and How to Use It
A brake pad thickness gauge is the easiest tool for checking how much friction material remains on disc brake pads. Color-coded gauges commonly measure from 2 mm to 12 mm, while calipers provide a more exact numerical measurement when the brake pad is accessible or removed. Always measure the friction material rather than the steel backing plate.
Brake pad thickness tells you far more than a quick visual inspection through the wheel. A pad that appears usable from one angle may have much less material on the inner side, especially if a caliper, slide pin, or piston is not moving correctly.
Several tools can measure brake pads. Simple go/no-go gauges are fast and easy to read, while a digital or vernier caliper gives a specific thickness. Specialty gauges with straight and 90-degree tips can reach pads that are difficult to access.
A brake pad measuring tool is especially useful during routine tire rotations, brake inspections, suspension work, or any time the wheel is already removed. Recording the measurement also lets you compare wear at the next service.
Many common gauge sets use 2, 3, 4, 5, 6, 8, 10, and 12 mm blades. Red, yellow, and green coloring provides a fast visual reference, but those colors should not override the vehicle manufacturer’s minimum pad-thickness specification.
The correct replacement point varies by vehicle and brake design. Some service information lists wear limits around 2 mm, while repair shops often recommend planning replacement before the pads reach that limit. Check the service information for your exact vehicle before making the final decision.
What Is a Brake Pad Measuring Tool?
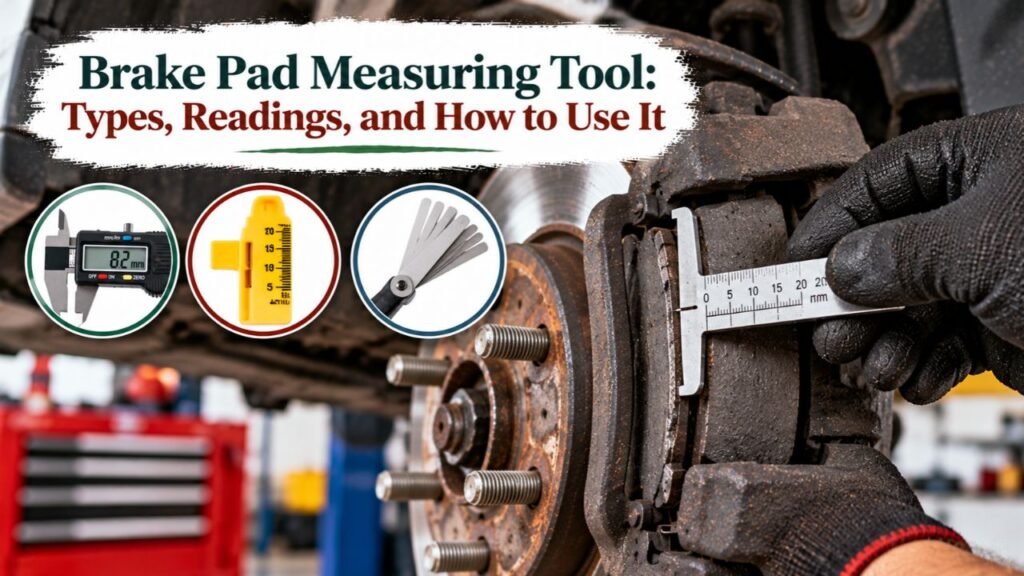
A brake pad measuring tool measures the remaining friction material between the rotor-facing surface of the pad and its steel backing plate.
It is sometimes called a:
- Brake pad gauge
- Brake lining thickness gauge
- Brake wear gauge
- Brake thickness gauge
- Brake pad depth gauge
- Brake lining gauge
These tools are designed to remove guesswork from brake inspection.
Color-Coded Brake Pad Gauge
The most familiar version consists of several blades with known thicknesses.
Common sizes are:
- 2 mm
- 3 mm
- 4 mm
- 5 mm
- 6 mm
- 8 mm
- 10 mm
- 12 mm
You compare the gauge blade with the remaining friction material.
Many sets use:
- Green for thicker pads
- Yellow for intermediate wear
- Red for thin pads
This design is fast enough for routine shop inspections and easy for a DIY owner to read.
Digital Caliper
A digital caliper can provide a reading to fractions of a millimeter.
It works best when the brake pad is exposed well enough for the jaws to contact only the friction material, or when the pad has been removed.
A digital caliper is useful if you want to track wear precisely rather than place the pad into a broad color category.
Vernier or Dial Caliper
A mechanical vernier or dial caliper performs the same basic measurement without electronics.
It works well when access is open.
The main challenge is keeping the backing plate out of the measurement.
Specialty Offset Gauge
Some pad gauges use offset or right-angle tips.
These are designed to reach between the rotor and pad where a straight tool cannot fit.
On certain vehicles, this style lets you check pad thickness without removing the caliper and, in some cases, without fully removing the wheel.
Key Takeaway: Color-coded gauges are fastest for routine checks, while digital or mechanical calipers provide more precise readings when the pad is accessible.
Brake Pad Measuring Tool Sizes Explained
Many manual gauge sets follow the same general size progression.
| Gauge Size | Typical Gauge Color | General Meaning |
| 12 mm | Green | Thick lining |
| 10 mm | Green | Thick lining |
| 8 mm | Green | Plenty of material |
| 6 mm | Yellow | Moderate wear |
| 5 mm | Yellow | Moderate wear |
| 4 mm | Yellow | Getting thinner |
| 3 mm | Red | Near replacement range on many systems |
| 2 mm | Red | Very thin; often near a service limit |
Treat this table as a measuring reference rather than a universal replacement chart.
A vehicle manufacturer may specify a different minimum thickness.
Why There Is No 7 mm or 9 mm Gauge in Many Sets
The goal of a go/no-go gauge is speed rather than measuring every possible decimal.
If a 6 mm blade fits but an 8 mm blade does not, the pad is somewhere between those measurements.
If you need an exact value, use a caliper.
Metric Measurements Are Most Useful
Brake pad thickness is usually discussed in millimeters.
Common inch equivalents include approximately:
- 2 mm = 0.079 in.
- 3 mm = 0.118 in.
- 4 mm = 0.157 in.
- 5 mm = 0.197 in.
- 6 mm = 0.236 in.
- 8 mm = 0.315 in.
- 10 mm = 0.394 in.
- 12 mm = 0.472 in.
Metric readings are easier to compare with most service specifications.
Key Takeaway: Common brake gauges cover 2–12 mm in selected steps, giving a quick indication of pad thickness without requiring a precision measuring instrument.
How to Use a Brake Pad Measuring Tool
The inspection becomes much easier with the vehicle safely lifted and the wheel removed.
1. Park the Vehicle Safely
Park on a firm, level surface.
Apply the parking brake when appropriate for the axle you are servicing and follow the vehicle lifting instructions.
Use:
- Correct lifting point
- Floor jack rated for the vehicle
- Properly positioned jack stands
Never work under or beside a vehicle supported only by a hydraulic jack.
2. Remove the Wheel if Needed
Some wheel designs provide enough visibility for a quick check, but removing the wheel gives you much better access to both the caliper and pads.
Loosen lug nuts according to normal wheel-removal practice and support the vehicle properly before taking the wheel off.
3. Locate the Friction Material
Look through the caliper opening.
A disc brake pad normally consists of:
Rotor → friction material → steel backing plate
You need to measure only the friction material.
Do not include the backing plate.
4. Inspect the Outer Pad
Choose a gauge blade that looks close to the remaining pad thickness.
Place it beside or between the accessible surfaces so you can compare the gauge thickness with the friction material.
If the 6 mm gauge appears too thick but the 5 mm gauge matches, record roughly 5 mm.
5. Inspect the Inner Pad
Do not stop after measuring the outside pad.
The inner pad may wear at a different rate.
Use an inspection opening, angled gauge, mirror, light, or caliper access method as appropriate for the brake design.
If one pad is much thinner than the other, further brake inspection is needed.
6. Check Both Ends of the Pad
Wear may also differ from one end of a pad to the other.
Compare the leading and trailing portions if they are visible.
Tapered wear can point toward mechanical problems rather than normal even wear.
7. Record the Measurement
Write down the thickness for each wheel.
For example:
| Wheel | Inner Pad | Outer Pad |
| Left front | 5 mm | 6 mm |
| Right front | 5 mm | 5 mm |
| Left rear | 7 mm | 7 mm |
| Right rear | 7 mm | 7 mm |
Tracking readings over time gives you a clearer picture of wear rate.
Key Takeaway: Measure the friction material on both inner and outer pads, compare more than one area when possible, and record each wheel separately.
How to Measure Brake Pads With a Digital Caliper
A digital caliper gives a more specific thickness reading than a stepped gauge.
Zero the Caliper
Close the jaws and press the zero button.
Make sure dirt is not trapped between them.
Position the Jaws on the Friction Material
Place the jaws so they contact only the pad material.
Do not include:
- Backing plate
- Shim
- Wear sensor
- Clip
If access does not allow proper jaw placement, remove the pad according to the vehicle service procedure rather than forcing an inaccurate measurement.
Take More Than One Reading
Measure near several points along the friction material.
This can reveal taper or uneven wear.
For example, a pad might read:
- 5.2 mm at one end
- 4.3 mm at the other
The lower area deserves attention even though the average thickness appears higher.
Compare Inner and Outer Pads
Measure both pads on the same caliper.
A substantial difference may indicate:
- Sticking slide pin
- Caliper piston problem
- Pad binding in bracket
- Corrosion
- Hardware problem
Do not assume uneven pad wear is solved simply by installing new pads.
Key Takeaway: A digital caliper gives a precise reading, but the measurement is useful only if the jaws contact the friction material without including the backing plate.
How Thick Are New Brake Pads?
New pad thickness varies by vehicle, axle, brake package, and pad manufacturer.
Passenger-vehicle pads are commonly somewhere around 8–12 mm of friction material when new, though thinner or thicker designs exist.
Large vehicles and performance brake systems may use different dimensions.
Do Not Use 12 mm as a Universal New-Pad Number
A 12 mm gauge being green does not mean every pad starts at 12 mm.
Some new pads may begin closer to:
- 8 mm
- 9 mm
- 10 mm
- 11 mm
- 12 mm
Rear pads can also start thinner than front pads on some vehicles.
Compare your measurement with service information for the exact vehicle if you want to estimate how much lining has been consumed.
What Brake Pad Thickness Means
Thickness gives you a useful maintenance reference, but it should not be treated as an exact percentage of remaining mileage.
8–12 mm
A reading in this area commonly indicates relatively thick lining.
The pads may be new or only partly worn, depending on their original thickness.
Inspect condition and wear pattern along with the measurement.
6 mm
Six millimeters is commonly placed in the yellow range on color-coded gauges.
There is still substantial material compared with a worn pad, but recording the measurement gives you a baseline for the next inspection.
5 mm
Five millimeters usually means the pad has seen noticeable use.
The urgency depends on:
- Vehicle specification
- Driving conditions
- Wear rate
- Inner-pad measurement
- Upcoming mileage
4 mm
Four millimeters is a good point to watch the pads more closely.
Many inspection systems place 4 mm in a caution range.
If you have a long trip coming up or the pads are wearing quickly, replacement planning may make sense.
3 mm
Many gauge sets mark 3 mm red.
At this point, replacement is commonly recommended soon even if the manufacturer’s absolute wear limit is slightly lower.
Thin pads leave less friction material between the rotor and backing plate.
2 mm
Two millimeters is very thin for many passenger-vehicle disc brake applications.
Some vehicle service information uses 2 mm as a wear limit.
Do not assume 2 mm is safe for every vehicle. Check the manufacturer’s specification.
Key Takeaway: Pad thickness should be judged against the vehicle’s service limit, wear pattern, and rate of wear rather than color coding alone.
Why You Should Measure Inner and Outer Brake Pads
A common inspection error is checking only the pad visible through the wheel.
That can miss uneven wear.
Sticking Slide Pins
A floating caliper needs to move freely on its guide pins.
If a pin sticks, one pad may work harder than the other.
Caliper Piston Problems
A piston that does not retract correctly can keep pressure on one pad.
That pad may wear much faster.
Pad Binding
Rust or debris around the bracket can prevent the pad from sliding normally.
The friction material can remain in contact with the rotor after braking.
Uneven Rotor Contact
A brake system with alignment or hardware problems may create tapered wear across the pad.
Measuring several points reveals the difference.
Key Takeaway: A single visible-pad reading can hide a brake problem. Always compare inner and outer pads whenever access allows.
Brake Pad Gauge vs Digital Caliper
Both tools are useful, but they serve slightly different purposes.
| Feature | Brake Pad Gauge | Digital Caliper |
| Speed | Very fast | Slower |
| Precision | Stepped reading | Precise numerical reading |
| Ease of use | Easy | Requires correct jaw placement |
| Tight access | Good with offset gauges | Often difficult |
| Color indication | Yes on many sets | No |
| Tracking exact wear | Limited | Excellent |
| Cost | Usually low | Varies |
| Best for | Routine inspection | Detailed measurement |
Choose a Brake Gauge If
You want:
- Quick inspections
- Easy visual readings
- Simple DIY use
- Fast shop checks
- Access without pad removal
Choose a Digital Caliper If
You want:
- Exact thickness
- Wear tracking
- Taper comparison
- Measurements after pad removal
- More detailed brake inspection
Many mechanics keep both.
The gauge provides a quick first reading, while the caliper confirms measurements when closer inspection is needed.
Can You Measure Brake Pads Without Removing the Wheel?
Sometimes.
It depends on the wheel, caliper, and brake-pad design.
Open Wheel Designs
Large openings between wheel spokes may let you see the outer pad.
A flashlight and angled brake gauge may provide enough access for a basic check.
Specialty 90-Degree Gauges
Right-angle gauges are designed for tight access between the pad and rotor.
Some can be used without removing the caliper and may work through the wheel on certain vehicles.
Why Wheel Removal Is Still Better
A through-wheel inspection often gives you a limited view.
It may not show:
- Inner pad
- Tapered wear
- Caliper hardware
- Rotor condition
- Pad cracks
Removing the wheel allows a much stronger brake inspection.
What if the Inner Brake Pad Is Thinner?
Do not simply average the two measurements.
The thinnest pad is the one that matters most for wear.
For example:
- Outer pad: 7 mm
- Inner pad: 3 mm
That brake assembly should not be treated as having 5 mm pads.
A large difference suggests something may be wrong with the caliper or pad movement.
Inspect:
- Guide pins
- Boots
- Pad hardware
- Caliper piston
- Bracket contact points
- Rotor condition
Correct the cause before or during pad replacement.
Can a Tire Tread Gauge Measure Brake Pads?
A tire tread-depth gauge is not my first choice for brake pads.
The tool is designed to measure depth from one surface to another, while brake friction material often sits in a location that is difficult to reference correctly.
A brake lining gauge or caliper gives a more direct measurement.
Use a tool made for pad inspection rather than improvising when brake service decisions depend on the reading.
Can You Use a Ruler to Measure Brake Pads?
A small metric ruler can provide a rough measurement if the pad is clearly visible.
It is far less convenient than a dedicated gauge.
Problems include:
- Difficult viewing angle
- Limited access
- Thick ruler edge
- Hard-to-read markings
- Trouble separating lining from backing plate
A low-cost brake gauge set is faster and easier to repeat consistently.
Signs Pads Need Attention Even if Thickness Looks Acceptable
Thickness is not the only reason to replace brake pads.
Inspect the friction material for other problems.
Cracked Friction Material
Large cracks or material separation can justify replacement even when several millimeters remain.
Contamination
Pads contaminated with brake fluid, grease, or oil may need replacement.
Cleaning the visible surface does not guarantee contamination has not entered the friction material.
Uneven or Tapered Wear
A pad that is thick at one end and thin at the other points toward a brake-system issue.
Separation From the Backing Plate
Replace a pad if friction material is lifting or separating from the steel plate.
Severe Heat Damage
Discoloration, glazing, crumbling material, or repeated overheating deserves inspection beyond a simple thickness reading.
Key Takeaway: Thickness is only one part of brake-pad condition; cracks, contamination, taper, separation, and heat damage can require service before the pad reaches its wear limit.
How Often Should You Measure Brake Pad Thickness?
There is no mileage interval that fits every vehicle.
Pad life changes with:
- Vehicle weight
- Driving style
- City traffic
- Highway driving
- Hills
- Towing
- Brake design
- Pad compound
- Regenerative braking on hybrids and EVs
A practical time to inspect pad thickness is during:
- Tire rotation
- Wheel service
- Brake-fluid service
- Suspension work
- Seasonal vehicle inspection
More frequent checks make sense if the pads are already approaching their service limit.
Recording the measurements lets you see how quickly they are changing.
Which Brake Pad Measuring Tool Is Best for DIY Use?
For most home garages, an inexpensive color-coded stepped gauge is the easiest starting tool.
Look for:
- 2–12 mm measuring range
- Metric markings
- Straight access blade
- Angled access where useful
- Metal or durable plastic construction
- Easy-to-read markings
Add a digital caliper if you perform brake jobs regularly.
Best Setup for Quick Checks
Use an 8- or 9-piece color-coded gauge set.
It requires little setup and gives a fast answer.
Best Setup for Detailed Brake Work
Use both:
- Brake pad gauge for initial inspection
- Digital caliper for exact measurement
This combination handles almost any normal home brake-pad measurement.
Brake Pad Measuring Safety Tips
Brake work deserves careful preparation because your stopping system depends on correct inspection and assembly.
Support the vehicle properly before removing a wheel.
Never place yourself beneath a vehicle held only by a jack.
Allow brakes to cool before touching the rotor or caliper. Hard driving can leave brake components hot enough to cause burns.
Avoid breathing brake dust.
Do not blow brake assemblies clean with compressed air. Use brake-service cleaning methods suited to the vehicle and follow the chemical product instructions.
Do not operate the brake pedal with the caliper removed unless the service procedure specifically calls for it.
If pad wear looks abnormal or you are uncertain about the reading, have the brake system inspected before returning the vehicle to normal use.
Conclusion
A brake pad measuring tool gives you a fast way to check remaining friction material instead of relying on visual guesswork. Color-coded gauge sets are simple and fast, while digital calipers give a more exact reading when pad access allows.
Many manual gauge sets include 2, 3, 4, 5, 6, 8, 10, and 12 mm sizes. These measurements make it easy to track pad wear, but the red, yellow, and green ranges should be treated as inspection aids rather than universal replacement rules.
Measure both inner and outer pads and use the lowest reading when judging wear. A large difference between them can point toward a sticking caliper, slide pin, or pad hardware problem that needs attention.
For a home mechanic, I would keep a color-coded brake gauge set and a digital caliper in the toolbox. Together they provide quick inspection and exact measurement without requiring expensive equipment.
FAQs About Brake Pad Measuring Tools
What Tool Is Used to Measure Brake Pads?
A brake pad thickness gauge is the simplest dedicated tool.
You can also use a digital, dial, or vernier caliper when the friction material is accessible enough for accurate jaw placement.
What Size Brake Pad Gauge Do I Need?
A set covering 2, 3, 4, 5, 6, 8, 10, and 12 mm handles most normal passenger-vehicle inspections.
Use your vehicle’s service specification to interpret the reading.
Is 3 mm Brake Pad Thickness Bad?
Three millimeters is considered thin on many brake systems and is marked red by many color-coded gauge sets.
Check the vehicle manufacturer’s wear specification and plan service rather than waiting for metal-to-metal contact.
Is 4 mm of Brake Pad Still Good?
Four millimeters is commonly treated as a caution range rather than an immediate failure point.
Wear rate, manufacturer specification, driving conditions, and the inner-pad measurement should guide the service decision.
Do You Measure the Metal Part of a Brake Pad?
No.
Measure only the friction material. Do not include the steel backing plate, shim, or wear hardware in the thickness reading.
Can I Measure Brake Pads Without Taking the Caliper Off?
Yes, on many vehicles.
A straight or offset brake gauge can reach the friction material through an inspection opening. Access varies, and some brakes need more disassembly for a trustworthy reading.
Should I Measure Both Brake Pads on Each Wheel?
Yes.
Inner and outer pads can wear at different rates. Measuring only the visible outside pad can miss severe inner-pad wear or a caliper problem.