
How to Remove Brake Pad Sensor Chevy Silverado: Practical Guide
When the brake warning light stays on after you replace the pads, the culprit is almost always the sensor wire that rubbed against the rotor or got torn during installation.
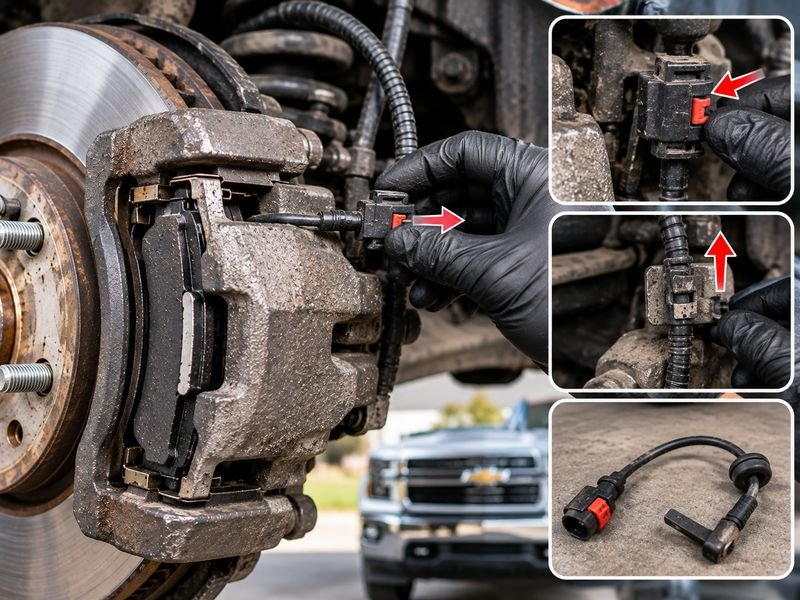
To remove the brake pad sensor on a Chevy Silverado, you simply unclip it from the caliper or bracket, disconnect the wiring harness connector, and pull the sensor out of the pad—no special tools are required for the removal itself.
The rest of this article explains the conditions, model-year differences, and practical steps that determine whether you can reuse the sensor or must replace it.
The decision to remove the sensor is not always as straightforward as it seems. If you are standing in your driveway with a new set of pads in hand, you might be tempted to cut the wire and forget about it, but that choice can leave you with a dashboard light you cannot reset.
The real tension here is that GM designed this system to be a wear indicator, not just a wire to delete, so the correct removal procedure depends on whether you are installing new pads, replacing a damaged sensor, or trying to silence a warning without addressing the root cause.
What the Brake Pad Wear Sensor Actually Does
The brake pad wear sensor on a Silverado is a small electrical loop embedded in the inboard brake pad. When the friction material wears down to a specific thickness, the rotor makes contact with the sensor wire, completing the circuit and triggering the warning light on the dash. This is a simple, mechanical system that relies on physical contact rather than computer calculations.
On most Silverado models, the sensor is only present on one front wheel, typically the driver’s side. Some rear disc brake configurations have sensors as well, but the front sensor is the one that causes the most confusion during pad replacement. The sensor wire routes from the pad, through a clip on the caliper or steering knuckle, and plugs into the main wiring harness near the wheel well.
Understanding this basic function matters because it changes how you approach removal. If you are replacing the pads, the sensor should be removed with the old pad and transferred to the new pad only if the new pad has a pre-cut slot for it. If your replacement pads do not have that slot, you cannot reuse the sensor, and you will need to either buy a sensor-equipped pad or install a new sensor separately.
Model-Year Variations That Affect Removal
Silverado generations differ in how the sensor is mounted and connected. The third-generation Silverado (2007–2013) and the fourth-generation (2014–2018) share a similar front brake design, but the connector location and clip style can vary. The 2019 and newer Silverado models use a different caliper design that changes how the sensor routes.
For 2007–2018 models, the sensor wire typically clips to the outside of the brake hose bracket or the caliper guide pin boot. You will see a small plastic retainer that holds the wire against the caliper. The electrical connector is usually a two-pin weatherproof plug located on the frame rail or near the upper control arm.
On 2019 and newer models, the sensor connector is often positioned higher up, closer to the strut assembly, and the wire routes differently around the brake hose. The removal process is the same in principle, but you may need to remove an additional plastic cover or push down on a release tab that is less accessible.
Before you start, check whether your specific trim level actually has a sensor. Some base work trucks and certain heavy-duty models use a different warning system or no sensor at all. If your truck does not have a sensor connector near the wheel, you may have a version that relies on the ABS wheel speed sensor to detect pad wear indirectly, which is not something you remove during a pad change.
Tools and Preparation
You do not need a specialized tool kit for this job. A flathead screwdriver, a pair of needle-nose pliers, and a small pick tool are usually sufficient. If the connector is corroded or stuck, a can of electrical contact cleaner and some dielectric grease will help with reinstallation.
Park the truck on a level surface, chock the rear wheels, and loosen the lug nuts on the front wheel before jacking it up. You do not need to remove the caliper entirely to access the sensor, but you do need enough clearance to see the clip and the connector. In most cases, turning the steering wheel to full lock toward the side you are working on gives you the best access without removing the wheel.
If you are only removing the sensor because it is damaged and triggering a false warning, you can often do the job without lifting the truck at all. The connector is usually reachable from behind the wheel with the truck on the ground, but you will need to turn the wheel to access the clip.
Step-by-Step Removal Process
Step 1: Disconnect the Wiring Harness
The first step is to unplug the sensor from the vehicle wiring. Do not pull on the wire itself. Locate the two-pin connector and press the release tab while pulling the connector body apart.
If the connector is tight, use a small flathead screwdriver to gently pry the tab.
On many Silverado models, this connector is tucked behind a bracket or covered by a rubber boot. Clean any dirt or debris from the area before disconnecting to prevent contamination from falling into the open connector.
Step 2: Release the Wire from the Retaining Clips
Follow the wire from the connector down to the caliper. You will see one or two plastic clips that hold the wire in place. These clips are usually push-in or snap-in types.
Use a pick tool to lift the clip tab, then pull the wire free. Do not yank the wire through the clip, as this can tear the insulation and cause a short.
On some models, the clip is integrated into the brake hose bracket. You may need to rotate the clip slightly to release the wire. If the clip is brittle from heat exposure, it may break during removal.
This is not a problem, as the new sensor or pad kit usually includes a replacement clip.
Step 3: Remove the Sensor from the Brake Pad
The sensor itself is either molded into the pad backing plate or inserted into a slot on the pad. If it is inserted, you can pull it straight out by gripping the base of the sensor where it meets the pad. If it is molded in, you cannot remove it without destroying the sensor, so you will remove the entire pad and discard the sensor with it.
For aftermarket pads that come with a sensor slot but no sensor included, you can transfer the original sensor by pulling it out of the old pad and pressing it into the new pad. Make sure the sensor clicks into place and sits flush with the pad backing plate. If it protrudes, it will contact the rotor prematurely.
Step 4: Inspect the Sensor and Wiring
Before reinstalling anything, inspect the sensor wire for cuts, abrasions, or melted spots. A sensor that has been rubbing against the rotor will have a worn or bare wire. If the wire is damaged, the sensor must be replaced.
Do not attempt to patch or solder a worn wear sensor, as the repair will not be reliable in the high-heat, high-vibration environment of the brake system.
Also inspect the connector terminals for corrosion or bent pins. If the terminals look green or crusty, clean them with electrical contact cleaner and a small wire brush. Apply dielectric grease to the terminals before reconnecting.
When You Should Not Reuse the Sensor
The most common mistake is reusing a sensor that has already been worn down by the rotor. The sensor is designed to wear along with the brake pad. Once the warning light has come on, the sensor tip has been ground down and may no longer make proper contact with the new pad.
If you install a worn sensor on a new pad, the warning light may come on immediately or may not work at all when the new pad eventually wears down.
If the original brake pads wore down to the point of metal-on-metal contact, the sensor is almost certainly destroyed. In that case, you must buy a new sensor or a pad set that includes one. Many aftermarket pad kits include a new sensor in the box, so check the contents before you assume you need to order one separately.
Another situation where you should not reuse the sensor is when you are switching to a different pad brand that does not have the sensor slot. Some performance and ceramic pads omit the slot entirely. In that case, you have two options: install a universal clip-on sensor that mounts to the caliper, or bypass the sensor and accept that the warning light will not function.
Bypassing the sensor is not recommended because it disables a safety feature, but it is a common practice on trucks used primarily off-road where mud and debris constantly damage sensors.
How to Handle the Warning Light After Removal
If you remove the sensor because it was damaged and you are not replacing it, the warning light will remain on. The only way to turn it off is to either install a new sensor or use a scan tool to clear the code. On most Silverado models, simply clearing the code will not work if the sensor circuit is still open.
The system will detect the missing sensor and turn the light back on.
If you are installing new pads with a new sensor, the light should go out automatically once the ignition is cycled and the system sees a complete circuit. You do not need to perform any special reset procedure. If the light stays on after installing a new sensor, double-check the connector and the clip.
A loose connection or a pinched wire is the most likely cause.
Common Mistakes and How to Avoid Them
One frequent error is routing the new sensor wire incorrectly. The wire must follow the original path through the clips and away from the rotor. If you leave the wire hanging loose, it can contact the spinning rotor and be cut within a few miles.
Always route the wire behind the caliper and through the factory clips.
Another mistake is forgetting to plug the connector back in before reinstalling the wheel. This sounds obvious, but the connector is often out of sight after the wheel is mounted. Plug it in and test the connection before you lower the truck.
Finally, do not use the sensor wire as a handle to pull the old pad out of the caliper. The wire is thin and will break easily. Pull the pad by the backing plate, then remove the sensor separately.
Professional Help and When to Seek It
If you have removed the sensor and installed new pads, but the warning light still behaves erratically, the issue may not be the sensor at all. A failing ABS module, a damaged wheel speed sensor, or a wiring short elsewhere in the brake system can produce a similar warning. If you have verified the sensor circuit is intact and the light remains on, have the system diagnosed with a professional scan tool that can read the specific brake system codes.
Removing the brake pad sensor on a Chevy Silverado is a straightforward task that most DIY owners can handle in under thirty minutes. The key is to treat the sensor as a component that either gets replaced with the pad or transferred carefully, not as a nuisance wire to cut. Taking the time to route the new wire correctly and inspect the connector will save you from chasing a false warning light later.
Conclusion
The practical takeaway is that removing the brake pad sensor on a Chevy Silverado is simple only when you know whether you are reusing, replacing, or deleting it. The major limitation is that you cannot just unplug the sensor and expect the warning light to go away, because the system is designed to detect an open circuit. Always inspect the sensor for wear before reinstalling it, route the new wire through the factory clips, and verify the connector is clean and fully seated.
If you are replacing the pads, check whether your new pads include a sensor slot or a new sensor in the box, and if the original sensor shows any signs of rotor contact, replace it rather than reusing it. With the correct approach, you can complete the job without a trip to the shop and keep your brake warning system functioning as intended.