How to Remove Brake Master Cylinder Push Rod: Steps and Safety
To remove a brake master cylinder push rod from a serviceable manual-brake master cylinder, disconnect its pedal linkage, remove the cylinder if required, pull back the dust boot, release the retaining snap ring, and withdraw the rod carefully. However, this method does not apply to every vehicle. Many power-brake systems have a separate rod attached to the brake booster, while some master cylinders are sealed or supplied as non-serviceable assemblies.
The confusing part is that several different components are commonly called the “master cylinder push rod.” Removing the wrong clip, pulling on a booster output rod, or changing an adjustable rod’s length can cause a low pedal, dragging brakes, or loss of hydraulic pressure. A working retainer is also essential: without it, a compatible manual-brake rod may no longer be properly captured.
This guide explains how to identify the rod, prepare the brake system, remove a retained push rod in numbered steps, inspect its parts, and reinstall everything correctly. It also explains when the safer repair is to replace the complete assembly rather than disassemble it.
Which Brake Master Cylinder Push Rod Do You Have?
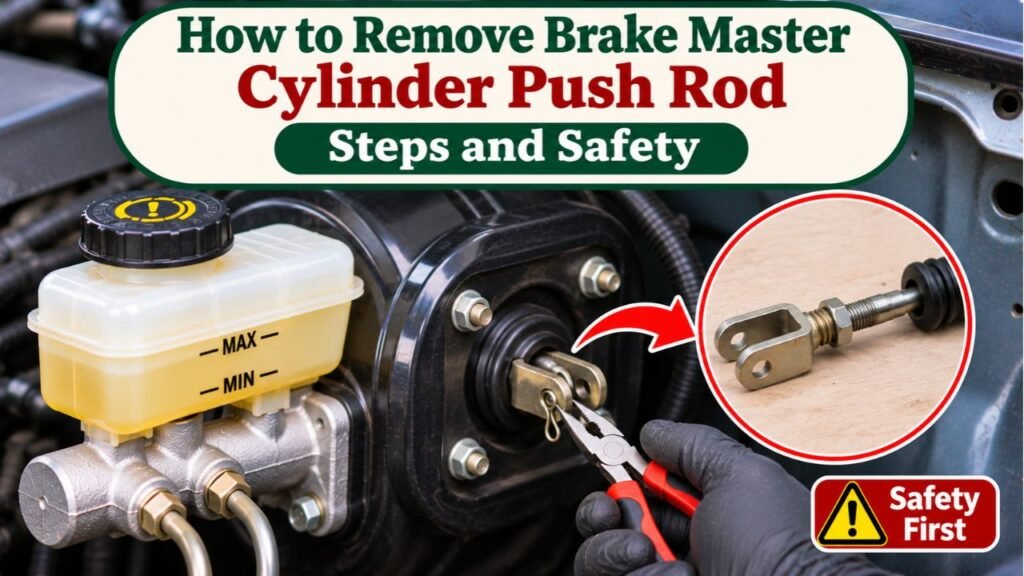
First identify exactly where the rod sits and what it connects to. The removal procedure changes substantially between manual brakes and power-assisted brakes.
| Rod or Connection | Where It Is Found | How Removal Differs |
| Retained master cylinder push rod | Extends from the rear of certain manual-brake master cylinders | A boot, washer, and internal snap ring or retainer may capture it |
| Brake booster output rod | Projects from the booster toward the master cylinder piston | Usually remains with the booster when the master cylinder is removed |
| Brake booster input rod | Connects the brake pedal to the booster through the firewall | The pedal-end clip or pin can be disconnected, but the rod may remain attached to the booster |
An older manual-brake car or an aftermarket pedal-mounted master cylinder is more likely to have a push rod retained directly in the cylinder. Most conventional vacuum-assisted vehicles instead have a separate booster output rod pushing against the master cylinder piston.
Check the vehicle’s year, make, model, brake-assist type, and service manual. If the documentation does not authorize pushrod disassembly, do not assume the part can be pulled free.
Tools and Precautions for Master Cylinder Push Rod Removal
For a serviceable pushrod-and-snap-ring design, the following items are commonly useful:
- Vehicle-specific repair instructions and replacement retainer, if required
- Appropriate wrenches, sockets, and a flare-nut wrench if brake lines must be removed
- Internal snap-ring pliers suited to the retainer’s size and shape
- A small inspection light and nonmarring pick for the dust boot
- Safety glasses, brake-fluid-resistant gloves, and clean shop towels
- Drain pan, approved brake fluid, and plugs intended for brake hydraulic openings
- A vise with soft jaws or another method of supporting the cylinder without crushing it
- A suitable brake bleeding kit for any hydraulic circuit that is opened
Safety Note: A brake system is not a suitable place for improvised clips, bent push rods, incorrect fluid, or guessed adjustments. Work on a parked vehicle with the ignition off. On vehicles with electronic brake boosters, brake-by-wire functions, or special pressure-control systems, follow the manufacturer’s disabling and service instructions before touching hydraulic components. If the brake pedal is already unreliable, arrange repair without driving.
How to Remove Brake Master Cylinder Push Rod Step by Step
These steps apply only to a serviceable master cylinder with a mechanically retained push rod, typically a manual-brake design. They are not instructions for pulling the output rod out of a sealed vacuum booster.
Step 01: Confirm That the Push Rod Is Removable
Compare the actual assembly with its service diagram before touching the retaining hardware. Look for an external dust boot and an internal snap ring or circlip seated in a groove at the rear opening. Some designs use a washer, retaining plate, or a different attachment altogether.
Determine whether the cylinder’s manufacturer permits removal and whether new retaining hardware is available. A rod that appears to enter a cylinder is not proof that the two parts are serviceable separately. If a manual shows replacement of the entire cylinder rather than pushrod disassembly, follow that instruction. Also check whether the new cylinder is supplied with a matched push rod, since transferring the old one can change piston travel.
Step 02: Secure the Vehicle and Protect Against Brake Fluid
Park on firm, level ground, engage the parking brake, and prevent the wheels from rolling. Switch off the ignition and keep the keys away from the vehicle while the assembly is being worked on. Set protective towels around painted surfaces because spilled brake fluid can damage the finish.
If the brake system will be opened, have the specified fresh brake fluid, clean caps, and bleeding equipment ready beforehand. Never reuse drained fluid or allow dirt to enter the ports. For conventional vacuum-assisted systems, repeated pedal applications with the engine off can deplete stored vacuum, but this does not safely depressurize every hydraulic or electronically assisted system. Consult the service procedure if assistance equipment is present.
Step 03: Record the Original Push Rod and Pedal Linkage Position
Before loosening anything, take a clear photograph of the brake pedal connection, the clevis, its retaining pin, and any washers or spacers. Note which side the clip enters from and how the brake-light switch sits relative to the pedal arm.
If the assembly has an adjustable threaded clevis, record its position using the manufacturer’s measurement method. A paint mark can help with orientation but does not replace a specified rod-length or pedal-free-play check. Do not spin a jam nut or adjust a rod merely to make disconnection easier. That setting affects how far the master cylinder piston returns when the driver releases the pedal.
Step 04: Disconnect the Push Rod From the Brake Pedal
Move to the driver’s footwell and locate the pushrod connection near the upper brake pedal arm. Remove any trim needed for access without tugging on nearby wiring. Depending on the vehicle, the linkage may use a cotter pin, hairpin clip, retaining spring, plastic bushing, or other dedicated retainer.
Release the specified fastener, support the rod, and slide out the clevis pin or separate the pedal connection as directed. Keep washers in their original order and inspect the bushing for cracks or wear. Never hammer against the pedal, pry on a brake-light switch, or bend the rod sideways. This step frees the pedal end; it does not remove a booster input rod from inside the booster.
Step 05: Remove and Support the Master Cylinder if Required
If the retained pushrod cannot be accessed in place, follow the vehicle’s master cylinder removal procedure. Disconnect the fluid-level sensor if fitted. If the hydraulic lines must come off, use a properly fitting flare-nut wrench, collect fluid, and immediately cap the lines and cylinder ports with approved clean plugs.
Remove the master cylinder mounting fasteners while supporting its weight, then lift it away without dragging the rod across the firewall opening. Avoid pulling on brake tubes or letting a disconnected cylinder hang by them. Some booster inspections permit moving a master cylinder aside while the lines stay connected, but this is not the same as extracting a push rod captured inside a manual-brake master cylinder. Use whichever procedure the service manual specifies.
Step 06: Expose the Push Rod Retaining Ring
Place the removed cylinder on a clean work surface or secure its mounting flange gently in protected vise jaws. Do not squeeze the reservoir, brake ports, or aluminum cylinder body. Keep its open ends away from metal filings and loose workshop debris.
Slide or peel the rubber dust boot back from the rear opening without tearing its sealing lip. Shine a light into the bore to locate the circlip, snap ring, or retaining washer. On designs with an internal snap ring, the ring sits in a machined groove and prevents the rod or piston-retaining parts from coming out. Note the exact arrangement before removing anything, and stop if it does not match the diagram.
Step 07: Release the Snap Ring Without Damaging the Bore
Use the correct snap-ring pliers and keep your face away from the opening. Where the service instructions call for it, apply slight inward pressure to the push rod to take spring load off the retainer. Compress or spread the ring only as required by its design, then lift it clear of the groove in a controlled manner.
In Wilwood’s single master cylinder rebuild instructions, the rubber boot is moved aside to access a snap ring, and the push rod, ring, and washer are removed after the ring is released. That procedure describes the specific Wilwood cylinder shown, not every original-equipment assembly.
Avoid scratching the bore with a screwdriver or forcing a retainer that has no accessible removal feature. Spring-loaded parts may shift when the ring is released.
Step 08: Withdraw the Push Rod and Retaining Washer
Once the retainer is fully free, guide the push rod straight out of the cylinder opening. Keep the boot, washer, bushing, and other removable parts in the order they came off. Depending on the design, a washer may come out with the rod or remain against the piston.
Some assemblies have a captive ball-end connection or an internal piston arrangement that requires a different manufacturer-approved release procedure. If the rod resists gentle straight movement, stop rather than twisting or prying. Do not pull the piston assembly out unless you are performing an authorized master cylinder overhaul. Excess force can damage the piston seal, score the bore, or turn a simple linkage repair into a complete cylinder replacement.
Step 09: Inspect the Push Rod, Boot, and Retainer
Roll the rod on a known-flat surface or inspect it against a straight reference for obvious bending. Examine the contact tip for flattening, pitting, unusual wear, or damaged threads. Check the clevis hole and pedal bushing for looseness that could create excess free play.
Inspect the dust boot for splitting, and confirm that the retaining ring has not lost its shape. Look inside the exposed opening for signs of corrosion or brake fluid leakage. If the rod or cylinder is damaged, use the correct replacement part or assembly; do not grind a rod tip, straighten a severely bent rod, or substitute a hardware-store snap ring. A leaking rear seal requires attention to the master cylinder itself, not merely a new push rod.
Step 10: Refit the Push Rod and Secure Its Retainer
If the manufacturer permits reuse or replacement of these parts, reinstall them in the documented order. Use only the specified lubricant, if required, and keep grease or dirt out of the hydraulic passages. Seat the washer and pushrod in their designed positions without nicking the seals or disturbing the piston’s normal resting location.
Fit the correct snap ring fully into its groove and check its seating from more than one angle. Then position the dust boot over the rear opening so its lip seals properly. The rod must remain securely retained while moving through its intended travel. If the ring won’t seat, the spring feels abnormal, or the parts differ from the service diagram, stop and correct the mismatch before reinstalling the cylinder.
Step 11: Reinstall the Cylinder and Restore Hydraulic Integrity
Return the assembly to its mounting location without pushing the piston forward unintentionally. Reconnect the pedal linkage with the correct bushings, washers, and new retainers where specified. Tighten mounting and hydraulic fittings to vehicle-specific specifications; there is no universal master cylinder torque figure.
If any brake line was opened, follow the manufacturer-approved bleeding sequence. The cylinder may require bench bleeding, and some ABS systems need a scan tool for part of the process. AutoZone’s master cylinder replacement guide describes master cylinder installation and subsequent hydraulic bleeding. That general guidance must be adapted to the exact vehicle rather than treated as a substitute for its service manual.
Keep the reservoir at the specified level throughout bleeding. Never rely on a firm-feeling pedal alone to prove that no air remains in the system.
Step 12: Verify Pedal Return, Brake Lights, and Leak-Free Operation
With the vehicle still stationary, check that the pedal moves smoothly and returns to its normal position. Confirm that the brake lights illuminate when the pedal is pressed and switch off when released. Inspect hydraulic connections for seepage and recheck reservoir level.
The technician should then verify rod clearance, pedal free play, and pedal height against the applicable service information, along with hydraulic pressure retention and any required electronic brake checks. Incorrect rod length can keep a piston partly depressed or leave excess travel before braking begins. Do not drive the vehicle if the pedal sinks, brakes drag, a warning light remains on, or any leak appears. Roadworthiness must be confirmed after the repair, not assumed from successful disassembly.
What if the Push Rod Is Attached to the Brake Booster?
When the master cylinder is bolted to a vacuum booster, its rear piston usually contacts the booster’s output rod. Removing the master cylinder exposes that rod; it does not mean the rod must be detached from the booster. On many vehicles, the output rod is not intended for routine removal.
Ford’s 1993 Mustang workshop instructions describe a booster output rod whose factory-set length normally needs no adjustment. They also explain that an overly long rod can cause brake drag, while one that is too short can increase pedal travel. Those details illustrate why a generic pull-and-reinstall method is unsafe.
If you’re replacing only the master cylinder, leave the booster output rod undisturbed unless the service manual requires otherwise. If you’re replacing the booster, disconnect its input rod from the brake pedal using the specified clip or pin, then remove the booster as an assembly. A pedal-end disconnection is not permission to pull the input rod out of the booster housing.
Push Rod Removal Problems That Require a Different Repair
A stuck snap ring: Clean the accessible area and identify the correct tool and ring type. Do not gouge the bore or drill out a retainer. If corrosion prevents approved disassembly, replacement may be safer.
A push rod that will not pull free: Check for a captive joint, hidden retaining feature, or non-serviceable construction. Forcing it can damage the piston and seal.
A low pedal after reinstallation: Verify the pedal connection, rod length, free play, piston return, and bleeding procedure. A low pedal may indicate trapped air or a mechanical mismatch rather than a defective replacement part.
Brakes that remain applied: Stop testing and have the pushrod-to-piston clearance checked. A rod that prevents the piston from returning can trap hydraulic pressure.
Fluid around the rod opening: Inspect for a failing rear master cylinder seal. Cleaning or replacing the boot alone will not repair an active hydraulic leak.
FAQs About How to Remove Brake Master Cylinder Push Rod
Can You Pull a Brake Master Cylinder Push Rod Out by Hand?
Only after its approved retaining hardware has been released, and only on a serviceable design. A captive rod or booster output rod should not be pulled free merely because it appears loose or accessible.
Do You Have to Remove the Master Cylinder to Remove the Push Rod?
Not always, but removing a rod retained inside a manual master cylinder often requires bench access. Simply disconnecting a booster pushrod from the brake pedal may not require opening the hydraulic system. Follow the vehicle’s instructions for the specific task.
What Holds a Manual Brake Master Cylinder Push Rod in Place?
Some serviceable assemblies use a snap ring or circlip, retaining washer, and dust boot. Others have different captive connections. The boot generally protects the opening; it is not a substitute for the mechanical retainer.
Can I Reuse the Old Snap Ring and Push Rod?
Only if the manufacturer allows it and both parts pass inspection. A distorted retaining ring, bent rod, damaged contact tip, or worn clevis should be replaced using approved components rather than improvised repairs.
Does Removing a Push Rod Mean I Have to Bleed the Brakes?
Removing a rod alone does not necessarily introduce air into a closed hydraulic system. If a brake line or hydraulic component was opened, however, the correct bleeding procedure is required before the vehicle returns to service.
Remove the Correct Push Rod and Protect Brake Pedal Operation
Knowing how to remove brake master cylinder push rod starts with identifying whether the rod belongs to a serviceable manual master cylinder or a separate brake booster. On a retained design, the essential sequence is to free the pedal connection, access the cylinder’s rear retainer, release it with the proper tool, and withdraw the rod without damaging the bore.
The job is not finished when the rod comes out. Correct retaining hardware, original linkage geometry, and full piston return matter just as much during reassembly. Any opened hydraulic circuit also needs proper bleeding and inspection.
For a sealed or unfamiliar design, choose the vehicle-specific repair procedure or qualified brake service instead of forcing the rod loose. Preserving reliable braking is more important than saving a removable part.