Are Brake Calipers Left and Right: Clear Answers and Key Facts
If you’re holding a brake caliper in your hand and wondering whether it matters which side of the car it goes on, the short answer is yes: brake calipers are side-specific in most modern vehicles. You cannot simply swap a caliper from the left side to the right side without risking brake failure, uneven pad wear, or a spongy pedal.
This article explains why left and right calipers differ, how to identify which side you need, and what happens when someone installs the wrong one. It also covers the few exceptions where a single caliper design works on both sides and walks you through the practical steps for confirming fitment before you buy or install.
The Real-World Moment That Raises the Question
Picture this: you’re replacing a seized caliper on a Saturday morning. The part store lists two options, one for the left front and one for the right front, but the caliper you removed is already off the car and sitting on the bench. You look at the mounting bracket, the bleeder screw, and the brake hose connection, and you start to wonder if the store is just trying to sell you two parts when one would do.
That moment of uncertainty is common, and it’s also where a lot of DIY brake jobs go wrong. A caliper that looks symmetrical at a glance often has internal passageways, bleed screw positions, and hydraulic ports that are mirrored for a specific side. Installing the wrong one can trap air in the system, prevent proper bleeding, or cause the pads to contact the rotor at the wrong angle.
Understanding the physical differences before you order saves you time, money, and a second trip to the parts counter.
Why Brake Calipers Are Side-Specific
Brake calipers are side-specific primarily because of the bleeder screw location and the hydraulic fluid inlet port. These two features determine whether air can be purged from the system and whether the brake hose connects without kinking.
On a correctly installed caliper, the bleeder screw sits at the highest point of the hydraulic chamber. This allows air bubbles, which naturally rise, to escape when you open the bleeder during bleeding. If the caliper is installed on the wrong side, the bleeder screw ends up lower than the fluid passages, trapping air at the top of the bore.
That trapped air compresses under pedal pressure, creating a soft or spongy brake pedal that never fully recovers no matter how many times you bleed the system.
Bleeder Screw Position and Brake Bleeding
Think about the caliper’s orientation on the vehicle. When mounted on the front of the rotor, the caliper body spans the top and bottom of the disc. The bleeder screw must be positioned at the top of that span.
On a left-side caliper, the bleeder screw is typically on the upper rearward edge. On a right-side caliper, it is on the upper forward edge. These positions are mirrored, not identical.
If you install a left caliper on the right side, the bleeder screw points downward or sits at a lower plane than the internal fluid gallery. Air collects at the high point, and no amount of conventional bleeding will remove it. Some technicians try to compensate by pressure bleeding or bench bleeding, but the fundamental geometry is wrong.
Brake Hose Inlet and Routing
The brake hose inlet also differs between sides. The inlet is the machined port where the brake line or flexible hose attaches. On a side-specific caliper, this port is angled so the hose follows a clean path without rubbing against the suspension arm, steering knuckle, or wheel assembly.
Installing the wrong caliper forces the hose into an unnatural bend, which can lead to chafing, cracking, or a loose connection over time.
Additionally, some calipers have an internal crossover passage that routes fluid from the inlet on one side of the piston to the other. This passage is cast into the caliper body and cannot be reversed. A caliper designed for the left side has its crossover passage oriented for that side’s piston placement.
How to Identify Left and Right Calipers
Most calipers have identifiable markings, but they are not always obvious. The most reliable method is to look at the bleeder screw and the parking brake cable attachment (for rear calipers) when the caliper is in its installed orientation.
Here is a practical way to determine which side a caliper fits:
- Check the bleeder screw position: Hold the caliper as it would sit on the vehicle with the rotor opening facing you. The bleeder screw should be on the top half of the caliper. If it is on the bottom, it is likely for the opposite side.
- Look for a stamped or cast letter: Many manufacturers cast an “L” or “R” into the caliper body or bracket. This is often near the mounting ears or on the back of the casting. Clean the area with a wire brush if the letter is obscured by rust or brake dust.
- Inspect the emergency brake lever: On rear calipers with an integrated parking brake, the cable bracket or lever arm is positioned to pull in a specific direction. A left rear caliper has the lever oriented differently than a right rear caliper.
- Compare the mounting bracket offset: The bracket that holds the caliper to the steering knuckle is often offset to center the caliper over the rotor. This offset is mirrored for each side.
If you still cannot tell, take the old caliper with you to the parts store. A knowledgeable counter person can compare the casting numbers or measure the bleeder screw location against a new unit.
Are There Calipers That Work on Both Sides?
Yes, some calipers are universal or non-side-specific. These are most common on older vehicles, certain rear drum-in-hat setups, and some low-performance applications where the caliper mounts behind the axle centerline rather than in front of it.
On a universal caliper, the bleeder screw is positioned at the top center of the bore, and the fluid inlet is located symmetrically. This design allows the same casting to be used on either side of the vehicle. The caliper simply gets flipped, and the bleeder screw remains at the highest point because the bore is centered.
However, universal calipers are increasingly rare. Modern vehicles with larger rotors, multi-piston designs, and integrated electronic parking brakes almost always use side-specific castings. If a parts catalog lists separate left and right part numbers, trust that distinction even if the calipers look identical in a photo.
Sliding Calipers vs. Fixed Calipers
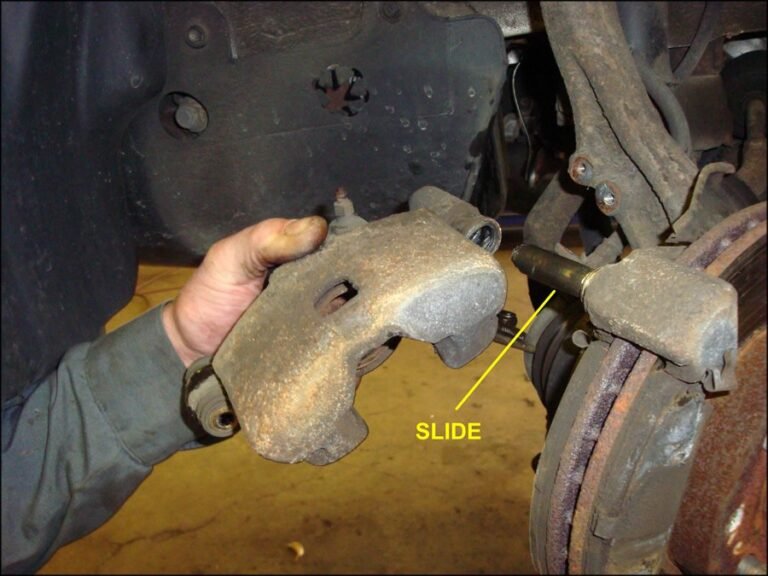
The distinction between sliding and fixed calipers also affects side specificity. A sliding caliper has a single piston on the inboard side and a frame that slides on guide pins. These are more likely to be side-specific because the bleeder screw and fluid port are positioned relative to the slide direction.
A fixed caliper has pistons on both sides of the rotor and is often bolted directly to the knuckle. Fixed calipers are almost always side-specific because the internal crossover passages connect the inboard and outboard piston bores. The casting is machined with separate fluid galleries for each side, and those galleries are mirrored, not shared.
What Happens If You Install the Wrong Caliper?
Installing a caliper on the wrong side is not just a minor inconvenience. It creates several distinct problems that affect brake performance and safety.
The most immediate issue is air entrapment. As described earlier, the bleeder screw will not be at the highest point, so you cannot fully bleed the caliper. The pedal will feel soft, and braking distance will increase.
In some cases, the pedal may sink toward the floor under steady pressure.
The second issue is pad taper wear. A caliper designed for the opposite side may not align the piston squarely with the rotor surface. The pad then contacts the rotor at a slight angle, wearing one end of the pad faster than the other.
This reduces braking efficiency and can cause pulsation or noise.
The third issue is hose interference. The brake hose may contact the tire, suspension component, or bodywork. Over time, this contact abrades the hose, potentially leading to a rupture and sudden loss of brake fluid.
Finally, on rear calipers with an integrated parking brake, the cable will not align with the lever. The parking brake may not engage fully, or it may drag, causing premature pad wear and rotor overheating.
How to Confirm Fitment Before You Buy
Before purchasing a caliper, take these steps to confirm you have the correct side:
- Check the vehicle’s VIN or trim level: Some vehicles use different calipers depending on engine size, brake package, or rear disc vs. drum configuration. The side-specific part number is only valid for your exact brake option.
- Count the pistons: A single-piston caliper has different mounting requirements than a dual-piston or four-piston caliper. Verify the piston count matches the original.
- Measure the rotor thickness: Calipers are matched to specific rotor widths. A caliper for a thicker rotor will not clamp properly on a thinner one, and vice versa.
- Look for the bleeder screw cap: Many remanufactured calipers ship with a plastic cap on the bleeder screw. The cap’s position relative to the fluid inlet is a quick visual cue for side identification.
- Ask for the part number: If you are ordering online, cross-reference the part number with the manufacturer’s catalog. Do not rely solely on a photo that may show a generic caliper.
When to Replace Both Calipers on the Same Axle
Even if only one caliper is seized or leaking, it is often wise to replace both calipers on the same axle. The reasoning is straightforward: if one caliper has failed due to corrosion, internal wear, or a stuck piston, the opposite caliper has experienced the same operating conditions and is likely close to failure as well.
Replacing both calipers ensures balanced braking force between the left and right wheels. A new caliper on one side and an old, worn caliper on the other can cause the vehicle to pull to one side under hard braking. This is especially noticeable in wet conditions or during emergency stops.
Additionally, replacing both calipers at the same time simplifies the bleeding process. You only need to bleed the system once, and you know both calipers have fresh seals, guide pins, and pistons.
Professional Help and Safety Considerations
Brake work is one of the most safety-critical repairs you can perform on a vehicle. If you are not completely confident in your ability to identify the correct caliper, bleed the system properly, and torque all fasteners to specification, have the work done by a qualified mechanic.
Even if you are experienced, always follow these precautions:
- Never reuse a caliper that has been dropped or damaged.
- Always replace the copper washers or sealing washers on the banjo bolt connection.
- Torque the caliper mounting bolts to the manufacturer’s specification, not just “tight enough.”
- After installation, pump the brake pedal slowly until it feels firm before driving.
- Check the brake fluid level and top off with the correct DOT specification fluid.
If the brake pedal feels spongy after bleeding, or if the vehicle pulls to one side during a test drive, do not drive it further. Recheck the caliper orientation and the bleed procedure before considering the job complete.
Conclusion
Brake calipers are left and right side-specific in the vast majority of modern vehicles, and the distinction is not a marketing gimmick. The bleeder screw position, fluid inlet angle, internal passageways, and parking brake mechanism all depend on correct side orientation. Installing the wrong caliper leads to air in the system, uneven pad wear, hose interference, and compromised braking performance.
Before you order or install a caliper, confirm the side by checking the bleeder screw position, looking for a cast “L” or “R,” and comparing the part number to your vehicle’s exact brake option. When in doubt, replace both calipers on the axle and consult a professional if you cannot verify fitment. A few minutes of careful inspection now prevents a dangerous brake failure later.