How to Remove Brake Fluid Reservoir From Master Cylinder Safely
Most brake fluid reservoirs are attached to the master cylinder with rubber grommets plus a retaining pin, clip, screw, or molded locking feature. Remove as much fluid as possible first, disconnect the level-sensor wiring, remove any retainer, then carefully rock and pull the reservoir from its seals without damaging its plastic outlet nipples.
The exact mounting method varies among vehicles. Some reservoirs pull upward from two rubber seals, while others use a transverse retaining pin, metal clip, mounting screw, or a combination of those parts.
A few master cylinders have an integral reservoir that is not meant to be separated. Others may have an extra outlet supplying a hydraulic clutch, which adds another connection that must be handled before removal.
For how to remove brake fluid reservoir from master cylinder, inspect the assembly closely before applying force. If a pin, screw, or clip still holds the reservoir, pulling harder can crack the reservoir or break one of its molded outlet tubes.
Brake fluid also requires careful handling. Glycol-based brake fluids can damage painted surfaces, and the hydraulic system must remain clean. Bosch and Cardone both warn about brake-fluid contact with vehicle paint and stress preventing dirt from entering the hydraulic system.
Reservoir removal is often easiest after the master cylinder has been removed from the vehicle, especially when replacing the master cylinder and transferring the old reservoir. Cardone’s current master-cylinder instructions specifically address transferring a reservoir when the replacement cylinder is supplied without one.
Why Remove the Brake Fluid Reservoir?
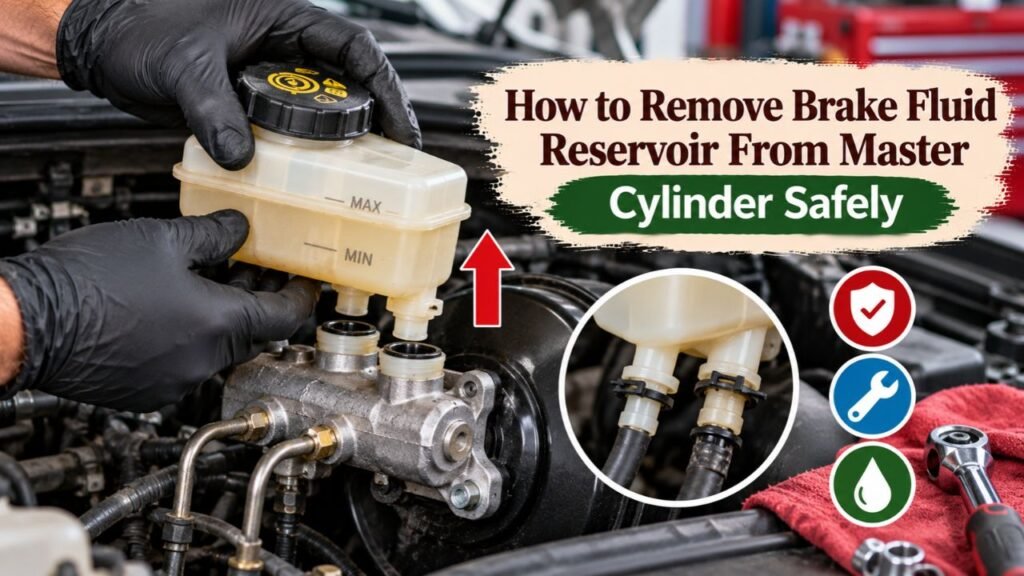
There are several reasons you may need to separate the reservoir from the master cylinder.
Replacing the Master Cylinder
Some replacement master cylinders are sold without a reservoir.
In that case, the original reservoir may need to be transferred to the new cylinder.
The old reservoir should be inspected carefully before reuse.
Replace it if you find:
- Cracks
- Broken mounting tabs
- Damaged outlet nipples
- Severe staining that prevents fluid-level inspection
- Leaking seams
- Damaged cap threads
- Faulty sensor mounting
Replacing Leaking Reservoir Grommets
The rubber seals between the reservoir and master cylinder can harden, shrink, swell, crack, or become damaged.
A leak at the base of the reservoir may appear as wet brake fluid around the master cylinder.
If the reservoir itself is intact, replacing the grommets may solve the leak.
Replacing a Damaged Reservoir
Plastic reservoirs can crack from:
- Age
- Impact
- Incorrect removal
- Excessive heat
- Previous repair work
A reservoir that leaks should not be patched with ordinary adhesive or sealant.
Install the correct replacement part.
Cleaning During Master Cylinder Replacement
If an old reservoir is transferred to a new master cylinder, it needs to be clean and free of debris.
Cardone recommends thoroughly cleaning a reused reservoir before transferring it to a replacement master cylinder.
Key Takeaway: Reservoir removal is most common during master-cylinder replacement, grommet repair, or reservoir replacement. Inspect the plastic reservoir and rubber seals before deciding which parts can be reused.
Tools and Supplies You May Need
The job usually requires only basic hand tools, but the exact retainer design changes the tool list.
Common items include:
- Safety glasses
- Chemical-resistant gloves
- Brake-fluid syringe or fluid extractor
- Clean drain container
- Small pick
- Small flat screwdriver
- Pliers
- Suitable sockets or wrenches
- Plastic trim tool
- Clean shop towels
- Replacement reservoir grommets
- Correct brake fluid
- New reservoir if required
- Master-cylinder bench-bleeding kit if replacing the cylinder
Avoid using large pry bars or heavy pliers on the plastic reservoir.
Too much force can crack an outlet nipple inside the master-cylinder grommet.
How to Remove Brake Fluid Reservoir From Master Cylinder
The following procedure applies to common removable plastic reservoirs mounted in rubber grommets.
Vehicle-specific service information takes priority.
1. Park the Vehicle Safely
Park on a flat surface.
Switch the engine off and keep dirt away from the brake system.
Open the hood and locate the master cylinder and reservoir.
The assembly is usually mounted near the firewall on the driver’s side of many conventional vehicles, though layouts differ.
2. Protect Painted Surfaces
Place suitable protective material around the master cylinder.
Brake fluid can damage automotive paint.
If brake fluid reaches a painted surface, rinse the affected area promptly according to the vehicle and fluid manufacturer’s recommendations. Bosch specifically warns that brake fluid can damage paintwork.
Do not wipe spilled brake fluid across a larger painted area.
3. Clean Around the Reservoir
Remove loose dust and debris from:
- Reservoir cap
- Master-cylinder body
- Sensor connector
- Reservoir mounting area
Do not allow dirt to fall into the reservoir or master-cylinder ports.
Brake hydraulic components require very clean working conditions.
4. Remove Brake Fluid From the Reservoir
Unscrew or release the reservoir cap.
Use a clean fluid syringe or extractor to remove as much brake fluid as possible.
Transfer the old fluid to an appropriate waste container.
Do not reuse extracted brake fluid.
Brake fluid can absorb moisture during storage and service, and contaminated fluid can affect hydraulic performance. HELLA notes that moisture lowers the fluid’s boiling point and can promote brake-system corrosion.
5. Disconnect the Fluid-Level Sensor
Many reservoirs have an electrical fluid-level sensor.
Release its connector lock carefully and unplug the wiring.
Do not pull on the wires themselves.
Some sensor designs are part of the reservoir while others can be transferred separately.
Inspect the connector for:
- Corrosion
- Broken lock
- Fluid contamination
- Damaged wires
6. Disconnect Any Additional Reservoir Hose
Some vehicles use the brake reservoir to supply a hydraulic clutch.
You may see a small hose connected to one side of the reservoir.
If present:
- Identify its routing.
- Release its clamp correctly.
- Disconnect the hose carefully.
- Prevent dirt from entering the hose.
- Control any remaining fluid.
Do not assume every reservoir has only the two main master-cylinder outlets.
7. Find the Reservoir Retainer
Look around the base of the reservoir before pulling it.
Possible retaining methods include:
- Metal roll pin
- Plastic retaining pin
- Spring clip
- Screw
- Bolt
- Molded locking tabs
- Grommet friction only
A pin may pass horizontally through the master-cylinder casting or reservoir mounting section.
Remove the retainer using the method specified for the vehicle.
Do not try to pull the reservoir through a retaining pin.
8. Support the Master Cylinder
If the master cylinder is on a workbench, secure it gently without crushing or damaging the casting.
If it is still installed in the vehicle, make sure you have enough working room to pull the reservoir without hitting nearby components.
Removing the whole master cylinder first may be safer if access is poor.
9. Rock the Reservoir Gently
Grip the reservoir close to its base rather than pulling from the cap neck.
Move it gently from side to side.
The goal is to release the plastic outlet nipples from the rubber grommets.
Do not use extreme twisting.
Aged plastic can become brittle.
10. Pull the Reservoir Out of the Grommets
Once the seals begin releasing, pull the reservoir away from the master cylinder in the direction of its outlet nipples.
On many designs this means pulling upward.
Other reservoir shapes may require a slightly angled movement.
Keep the pull controlled.
If one side releases first, avoid bending the remaining outlet nipple sharply.
11. Remove the Old Grommets
After the reservoir is removed, inspect the rubber grommets inside the master-cylinder ports.
If you are transferring the reservoir or repairing a leak, replacing old grommets is generally a sensible approach when new correct seals are available.
Use a small non-damaging tool to lift them out.
Avoid scratching the sealing bore.
12. Cover Open Master-Cylinder Ports
Do not leave the master-cylinder reservoir ports exposed while other work is being performed.
Keep dirt, water, shop debris, petroleum products, and incompatible cleaners away from the hydraulic system.
If the master cylinder is being replaced, proceed with the replacement procedure rather than leaving components open.
Key Takeaway: Extract the fluid, disconnect the sensor and any clutch feed, remove every retaining device, then gently rock and pull the reservoir from its rubber grommets. Never force a reservoir that still appears mechanically locked.
How the Reservoir Attaches to the Master Cylinder
Understanding the connection makes removal easier.
Rubber Grommet Mount
This is a common design.
The reservoir has molded plastic nipples that press into rubber grommets installed in the master cylinder.
The grommets perform two jobs:
- Seal brake fluid
- Hold the reservoir securely
A separate retaining pin may provide added mechanical support.
Pin-Retained Reservoir
Some assemblies use a metal or plastic pin through the master-cylinder body.
The pin prevents the reservoir from pulling free accidentally.
It must be removed before the reservoir can come out.
Screw- or Bolt-Retained Reservoir
Some reservoirs have a mounting flange secured with screws or bolts.
Remove those fasteners before attempting separation.
Integral Reservoir
Certain master cylinders are manufactured with a reservoir that is not intended to be removed independently.
If service information lists the master cylinder and reservoir as one assembly, replace the complete unit rather than trying to separate molded components.
Key Takeaway: Reservoirs may use friction-fit grommets, pins, clips, screws, or an integral design. Identify the mounting system before applying removal force.
Should You Remove the Master Cylinder First?
You can sometimes remove the reservoir while the master cylinder remains installed.
Removing the master cylinder first may be a better choice when:
- Reservoir access is restricted
- A retaining pin is hard to reach
- Reservoir plastic is old and brittle
- Master cylinder is already being replaced
- You need to inspect the grommet bores closely
Removing the master cylinder adds more work because brake lines must be disconnected.
Once hydraulic lines are opened, air enters the system.
The new or serviced master cylinder then needs the proper bleeding procedure.
Cardone instructs technicians to bench bleed replacement master cylinders before vehicle installation.
How to Remove the Master Cylinder for Reservoir Transfer
If you are replacing the master cylinder, reservoir removal is often performed on the bench.
Disconnect Electrical Connectors
Disconnect any brake warning or fluid-level wiring attached to the assembly.
Note connector locations.
Clean the Brake-Line Connections
Clean dirt from around the master-cylinder brake-line fittings before opening them.
This reduces the chance of contamination entering the system.
Disconnect the Brake Lines
Use the correct flare-nut wrench where appropriate.
Cap or protect open lines from contamination.
Do not bend the lines unnecessarily.
Remove the Master-Cylinder Mounting Nuts
The master cylinder is commonly bolted to the brake booster or firewall.
Remove its retaining nuts or bolts.
Do not remove the power brake booster simply because you are replacing the master cylinder.
Move the Master Cylinder to the Bench
Keep it upright as much as practical to reduce fluid spillage.
Once on the bench, remove the reservoir using its correct retainer and grommet procedure.
Key Takeaway: Bench removal gives better access but opens the hydraulic system. If the master cylinder comes off the vehicle, plan for proper bench bleeding and any required system bleeding afterward.
How to Install the Reservoir on a Master Cylinder
Installation deserves as much care as removal.
Inspect the Reservoir Outlets
Check the molded nipples for:
- Cracks
- Scratches
- Distortion
- Broken edges
A damaged outlet may leak even with new grommets.
Install New Grommets
Fit the correct seals into the master-cylinder ports.
Make sure they sit evenly.
Do not substitute random O-rings or hardware-store rubber.
Brake fluid requires compatible seal materials.
Lubricate Only as Specified
Many service procedures use clean, correct brake fluid to wet compatible rubber seals during assembly.
Do not use:
- Engine oil
- Chassis grease
- Petroleum jelly
- General-purpose lubricant
unless the vehicle or component manufacturer explicitly calls for that product.
Petroleum contamination can damage brake hydraulic seals.
Align the Reservoir
Position both reservoir nipples directly above their grommets.
Make sure the reservoir is oriented correctly before pressing.
Avoid starting one nipple at a severe angle.
Press the Reservoir Into Place
Use firm, even hand pressure near the base.
Press until the nipples are fully seated.
Do not hammer on the reservoir.
If it refuses to seat, stop and check:
- Grommet size
- Grommet alignment
- Reservoir orientation
- Outlet damage
Reinstall the Retaining Pin or Fastener
Reinstall every original retaining device.
Make sure pins, clips, screws, or bolts are fully seated.
Use replacement hardware if specified.
Reconnect the Sensor and Hose
Reconnect the fluid-level sensor.
Reconnect any clutch-fluid feed hose and its clamp.
Confirm that no hose is kinked.
Key Takeaway: Use the correct new seals, keep petroleum products away from brake components, align the reservoir carefully, press it in evenly, and reinstall every retainer.
Do You Need to Bleed the Brakes After Reservoir Removal?
It depends on how much of the system was opened and whether air entered the master cylinder.
Reservoir Removed From an Installed Master Cylinder
If the reservoir is removed while the master cylinder stays in place, air may enter the feed ports.
Bleeding may be needed before the vehicle is safe to drive.
Do not assume that simply refilling the reservoir removes trapped air.
Master Cylinder Removed
If brake lines are disconnected or a new master cylinder is installed, bleeding is required.
Replacement master cylinders are commonly bench bled first.
The vehicle’s hydraulic brake system may then require additional bleeding after installation.
ABS Systems Can Need Special Procedures
Some ABS and stability-control hydraulic units require a scan tool to cycle internal valves or pumps if air reaches certain parts of the system.
HELLA notes that ABS/ESP systems can require manufacturer-specific bleeding procedures and diagnostic control of hydraulic valves.
Use the correct service procedure for the vehicle.
Key Takeaway: Reservoir or master-cylinder work can introduce air into the hydraulic system. If air enters, bleed the brakes using the vehicle-specific sequence, including any ABS service procedure required.
What Brake Fluid Should You Use After Reinstallation?
Use only the specification approved by the vehicle manufacturer.
Common specifications include:
- DOT 3
- DOT 4
- DOT 4 LV
- DOT 5.1
DOT 5 silicone fluid is a different chemistry and should not be substituted simply because its number is higher.
Check:
- Reservoir cap
- Owner’s manual
- Service information
Do not mix fluids unless the specifications explicitly permit it.
Use brake fluid from a clean, properly sealed container.
Common Problems During Reservoir Removal
A reservoir that does not come out usually has a reason.
Reservoir Will Not Move
Check again for:
- Hidden retaining pin
- Mounting screw
- Clip
- Connected hose
- Hardened grommets
Do not keep increasing force until you know what is holding it.
One Side Comes Out but the Other Does Not
Avoid twisting the loose side far upward.
The remaining nipple can snap.
Push the loose side back slightly and work both seals progressively.
Reservoir Cracks During Removal
Stop using it.
A cracked brake-fluid reservoir must be replaced.
Do not attempt a permanent repair with ordinary glue.
Grommets Stay Attached to Reservoir Nipples
Remove them carefully and inspect the master-cylinder bores.
Use new correct grommets during reassembly if the old ones are aged, damaged, or distorted.
Fluid Leaks After Reinstallation
Possible causes include:
- Damaged grommet
- Wrong grommet
- Cracked reservoir nipple
- Reservoir not fully seated
- Damaged master-cylinder sealing bore
Clean the area and identify the exact leak source before driving.
Mistakes to Avoid
Prying Under the Reservoir With a Screwdriver
Hard metal prying can crack the plastic or damage the master-cylinder sealing surface.
Use controlled hand pressure whenever the design permits it.
Pulling Before Removing the Retainer
A hidden retaining pin can make a removable reservoir feel permanently stuck.
Inspect first.
Reusing Bad Grommets
Old seals may look usable but leak once disturbed.
Replacement seals are inexpensive compared with repeating the repair.
Contaminating Brake Fluid
Keep petroleum-based cleaners, oil, dirty tools, and general-purpose grease away from open brake hydraulic components.
Allowing the Master Cylinder to Run Dry
If the hydraulic circuits become empty, bleeding becomes more involved.
ABS-equipped vehicles may need additional procedures if air travels into the hydraulic unit.
Ignoring a Leak After Installation
Any brake-fluid leak around the reservoir or master cylinder needs correction before normal driving.
Conclusion
For how to remove brake fluid reservoir from master cylinder, start by extracting the old fluid, cleaning the area, disconnecting the fluid-level sensor, and checking carefully for pins, clips, screws, or extra hoses.
Once all retainers are removed, grip the reservoir near its base and gently rock it while pulling its outlet nipples from the master-cylinder grommets. Avoid aggressive prying because aged plastic nipples can break easily.
When reinstalling the reservoir, inspect it for cracks, use the correct seals, seat it evenly, reinstall its retainer, and refill the system only with the specified brake fluid.
If the master cylinder or hydraulic lines were opened, or air entered through the reservoir ports, perform the correct bleeding procedure before driving. The brake pedal should be firm, the reservoir level should remain stable, and there should be no fluid leakage anywhere around the repaired assembly.
FAQs About Removing a Brake Fluid Reservoir
Can You Remove the Brake Fluid Reservoir From the Master Cylinder?
Yes, many master-cylinder reservoirs are removable.
They are commonly pressed into rubber grommets and may also use a pin, clip, or screw. Some reservoirs are integral and are not intended to be separated.
Do I Have to Remove the Master Cylinder to Remove the Reservoir?
Not always.
Some reservoirs can be removed with the master cylinder still installed. Bench removal may be easier if access is poor or the master cylinder is already being replaced.
How Do You Pull a Brake Reservoir Out of the Grommets?
Remove every retainer first.
Grip the reservoir close to its base, gently rock it side to side, and pull in the direction the outlet nipples enter the seals. Do not bend one nipple sharply while the other remains installed.
Should I Replace the Reservoir Grommets?
Replace them if they are hard, cracked, swollen, distorted, leaking, or damaged during removal.
Using new correct grommets is also a good choice during master-cylinder replacement when the service parts are available.
Why Is Brake Fluid Leaking Under the Reservoir?
Possible causes include worn reservoir grommets, a cracked reservoir nipple, a damaged reservoir body, poor seating, or corrosion and damage at the master-cylinder port.
Clean the area and locate the source before replacing parts.
Can I Use Grease to Install Brake Reservoir Grommets?
Do not use ordinary petroleum grease.
Use only an assembly lubricant specified for that brake system. Clean compatible brake fluid is used in many brake-hydraulic assembly procedures, but vehicle-specific instructions take priority.
Do I Need to Bleed the Brakes After Removing the Reservoir?
Bleeding may be required if air entered the master cylinder.
If the master cylinder or brake lines were removed, plan on proper master-cylinder and hydraulic-system bleeding before driving.
Can I Reuse the Old Brake Fluid?
No.
Fluid extracted during service should not be poured back into the braking system. Use fresh brake fluid that meets the vehicle manufacturer’s specification.
Can I Clean a Brake Fluid Reservoir With Water?
Do not introduce water into brake hydraulic components.
Use the cleaning procedure specified by the reservoir or brake-component manufacturer and make sure a reused reservoir is completely clean, dry, and free of incompatible residue before installation.
What Happens if Dirt Gets Into the Master Cylinder?
Contamination can damage seals, block small hydraulic passages, or affect other brake components.
Keep every open reservoir and brake-line port protected during service and never use dirty tools or containers around brake fluid.