Where to Put Grease on Brake Pads: Exact Spots and Safety Tips
Apply brake grease only to the non-friction contact points: the pad ears or tabs where they slide in the abutment clips, selected areas on the back of the pad where the caliper piston or outer caliper fingers touch, and the caliper slide pins when the lubricant is compatible with their boots. Never put grease on the pad friction material or rotor face.
Brake grease has a narrow job. It reduces binding, corrosion, and vibration at moving contact points. Put it in the wrong place and the same lubricant that makes a pad slide freely can reduce the friction needed to slow the vehicle.
The safest approach is to use a thin film rather than a thick coating. Excess grease can migrate as the brakes heat up, collect dirt, or reach a surface that must remain dry. Brake-pad and vehicle-maker instructions also matter because some modern pads use bonded or multilayer shims that need no extra lubricant on the back.
Permatex lists its Ultra Disc Brake Caliper Lubricant with a temperature range of -40°F to 400°F, which shows why ordinary household or chassis grease is a poor substitute for a product made for brakes. Its current guidance also separates metal-to-metal lubrication from areas that contact rubber.
For anyone asking where to put grease on brake pads, my main recommendation is simple: lubricate only the points where the pad or caliper hardware is meant to slide or touch, and follow the pad maker’s instructions for the backing plate and shims. PowerStop, Permatex, AutoZone, and Bendix all warn against getting lubricant onto the pad friction surface or rotor.
The sections below show the exact lubrication points, the places that must stay dry, the right grease types, how much to apply, how to handle shims and slide pins, and what to do if grease reaches a friction surface.
Where to Put Grease on Brake Pads: The Exact Contact Points
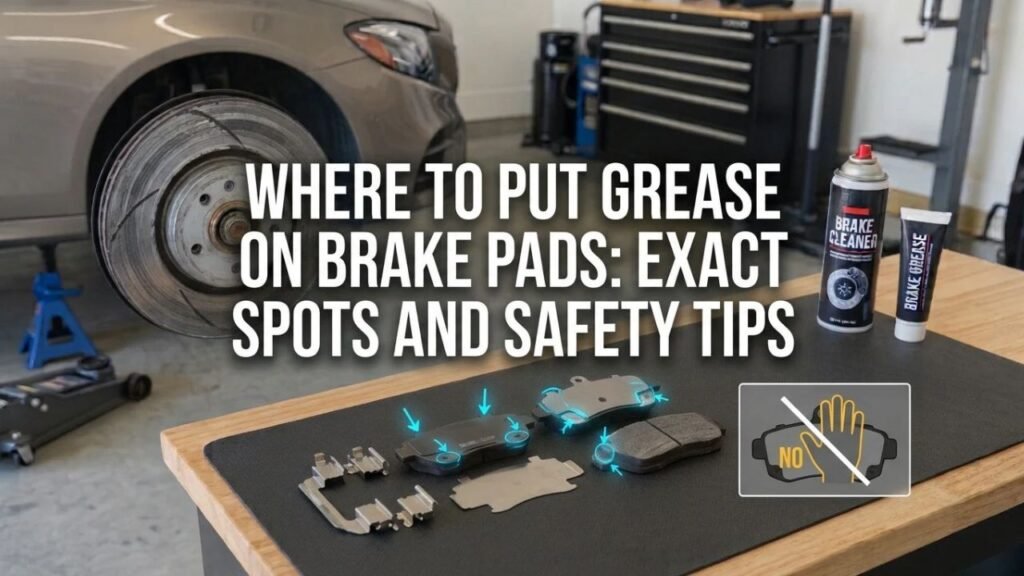
Brake grease belongs on moving or vibrating interfaces, not on the surface that creates stopping friction. On a typical floating disc brake, the main lubrication points are the pad tabs, selected backing-plate contact areas, abutment clips, and caliper slide pins.
Pad Ears or Tabs
The small metal ears at each end of the brake pad fit into the caliper bracket and slide against the abutment clips.
Apply a very thin film of brake lubricant to the metal contact areas where these tabs ride. PowerStop specifically calls for lubricant on the pad mounting-tab edges and abutment clips, while AutoZone also lists these pad contact points as normal lubrication locations.
Do not coat the full pad edge. Grease only the surfaces that actually contact the bracket or clip.
The bracket should be cleaned first. Rust built up under an abutment clip can squeeze the pad tabs tightly enough to cause binding. Grease cannot correct a bracket that still has heavy rust scale underneath the hardware.
Back of the Inboard Pad
The inboard pad is the pad contacted by the caliper piston on many floating-caliper designs.
Some pad makers allow a small amount of brake lubricant on the back of the pad where the piston contacts the backing plate or shim. PowerStop states that lubricant on the back of its pads is not required for noise control, but it permits a thin layer at the piston contact area if desired. Permatex lists the back side of brake pads as an approved application for its ceramic brake lubricant.
This is one area where product instructions matter. If the pad uses a bonded, coated, or multilayer shim that is intended to run dry, adding grease may serve no purpose.
Back of the Outboard Pad
On many floating calipers, the outer caliper fingers contact the back of the outboard pad.
If the pad or vehicle instructions call for lubrication there, place a thin film only at those metal contact spots. Do not smear grease across the entire backing plate.
I prefer identifying the actual witness marks left by the old caliper contact points and then checking the new pad instructions before applying anything.
Abutment Clips
Abutment clips sit in the caliper bracket and support the pad tabs.
A light film of brake lubricant can be used where the pad tabs slide on the clips. PowerStop’s caliper-installation guidance calls for high-temperature grease at the areas where the brake pad backing plate contacts the abutment clips.
Do not use grease to hide rusty, bent, or damaged clips. Replace damaged hardware and clean the bracket before fitting new clips.
Caliper Slide Pins and Bushings
Slide pins are not part of the brake pad itself, but they are a major lubrication point during a pad job on a floating caliper.
Clean the old lubricant from the pins and inspect them for corrosion, pitting, or damage. Apply a thin coat of a brake lubricant that is safe for the pin boots and bushings. PowerStop and Permatex both identify caliper pins, slides, and bushings as lubrication points.
A seized slide pin can leave one pad dragging or make the inner and outer pads wear at different rates.
Key Takeaway: Lubricate the pad tabs where they slide, the abutment-clip contact surfaces, approved backing-plate contact points, and compatible caliper slide pins. Use only a thin film.
Where Brake Grease Must Never Go
Brake systems depend on controlled friction. Some surfaces must remain completely free of lubricant.
Brake Pad Friction Material
Never put grease on the face of the pad that contacts the rotor.
PowerStop states that lubricant must not be applied to the friction side of the pad, and AutoZone gives the same warning. Grease there reduces the friction the brake is designed to create.
If a pad becomes heavily soaked with grease or oil, replacement is usually the safer choice rather than trying to rescue it.
Rotor Face
The rotor faces also need to stay clean and dry.
Grease, oil, dirty fingerprints, or another oily film can contaminate the friction interface. Brake cleaner is normally used to remove suitable surface contamination from a rotor before assembly.
Never use grease on a rotor because the brakes squeak. Squeal needs diagnosis at the hardware, pad, rotor, or caliper rather than lubrication of the friction surface.
Pad-to-Shim Area Unless the Maker Calls for It
This point varies by pad design.
PowerStop says not to place lubricant between its pads and noise-suppression shims. Bendix guidance for its own brake products describes lubricant between certain shim and backing-plate interfaces. Those instructions are not truly contradictory; they show that shim construction differs among pad designs.
Follow the instructions for the exact brake pad set. Do not assume every shim needs grease.
Rubber Parts With an Incompatible Grease
Some grease formulas can attack or swell rubber.
PowerStop warns against petroleum-based lubricants on plastic and rubber brake parts and recommends a suitable synthetic non-petroleum or silicone-based lubricant for those areas. Permatex also separates silicone products for rubber contact from ceramic products intended mainly for metal-to-metal interfaces.
Key Takeaway: Keep grease off the pad friction face and rotor, and do not put an unknown lubricant on rubber boots, seals, or shim interfaces that the pad maker says should remain dry.
What Type of Grease Should You Use on Brake Pads?
Use a product labeled for brake components.
General-purpose grease may soften rubber, run when hot, dry out, or leave deposits on brake hardware. Brake lubricants are formulated for heat, moisture, pressure, and the materials found around calipers.
Synthetic Brake Lubricant
A synthetic brake lubricant is a common choice for pad contact points and caliper hardware.
Check the label for the specific approved uses. A product may be suitable for metal hardware but not rubber seals, while another may be made for both.
Ceramic Brake Lubricant
Ceramic brake lubricants are commonly used at high-temperature metal-to-metal contact points.
Permatex lists ceramic brake lubricant for caliper pins, hardware, and pad backing surfaces, with separate product guidance for areas that contact rubber.
The word “ceramic” on the grease tube does not mean it is only for ceramic brake pads. It describes the lubricant formulation.
Silicone Brake Lubricant
Silicone-based brake lubricant is often used where rubber boots, sleeves, or seals are involved, provided the product label approves that application.
This is especially relevant to slide pins that operate inside rubber boots or bushings.
Anti-Seize Is Not a Universal Brake Grease Substitute
Anti-seize compound and brake lubricant serve different jobs.
Do not automatically use anti-seize on pad tabs, slide pins, or rubber-contact areas unless the vehicle or product maker specifically calls for it. Brake systems need the correct lubricant chemistry for heat and material compatibility.
Key Takeaway: Use brake-specific lubricant and match the product to the contact material. Metal-to-metal points and rubber-contact areas may call for different grease formulations.
How Much Grease Should Go on Brake Pads?
Use the smallest amount needed to leave a thin film on the intended contact point.
More grease does not make the brakes quieter or make the pads slide better. A thick blob can squeeze out during assembly or move as the brakes heat.
Permatex advises using a small amount or thin layer, and PowerStop gives the same general direction.
For pad tabs and abutment clips, the surface should look lightly coated rather than packed with grease.
For the piston or caliper-finger contact points on the back of a pad, use only enough to coat the exact contact patch if the pad maker calls for lubrication there.
For slide pins, coat the working surface evenly, then reinstall the pin without stuffing excess grease into the boot.
How to Grease Brake Pad Contact Points Correctly
The exact service procedure varies by vehicle, so torque values, pin treatment, electronic parking-brake steps, and pad orientation should come from the vehicle service information.
1. Support the Vehicle Safely
Park on a stable, level surface and use the lifting and support points specified for the vehicle.
Never work under a vehicle supported only by a jack.
Remove the wheel after the vehicle is securely supported.
2. Remove the Caliper and Pads
Follow the service procedure for the caliper type.
Some rear brakes use electronic parking-brake actuators or piston designs that require a specific retraction process. Forcing a piston back incorrectly can damage the mechanism.
Support the removed caliper so its weight is not hanging from the flexible brake hose.
3. Clean the Bracket and Hardware
Remove dirt, old lubricant, and loose corrosion from the pad-contact areas.
PowerStop recommends cleaning the bracket and removing rust where the hardware sits before installing new clips.
Heavy rust beneath an abutment clip needs removal so the new clip can sit flat and the pad can move without binding.
4. Lubricate the Pad Tabs and Clips
Install the correct clips, then apply a very thin film where the pad ears slide.
Do not spread grease toward the friction material.
The pad should move as intended in the bracket without being forced into place.
5. Service the Slide Pins
Remove and clean the slide pins if the brake design uses them.
Inspect the pins and boots. Replace parts that are badly corroded, torn, or damaged.
Apply a rubber-compatible brake lubricant where required and reinstall the pins according to the vehicle procedure.
6. Lubricate Approved Pad-Back Contact Points
Check the pad instructions.
If lubrication is specified, use a small amount at the piston contact area on the inboard pad and the caliper-finger contact areas on the outboard pad.
Skip this step if the pad maker says its shim system should run without added grease.
7. Reassemble and Check the Brake Pedal
Install the caliper and torque fasteners to the vehicle maker’s specification.
After both sides of the axle are complete and the wheels are installed, press the brake pedal before moving the vehicle. The pedal may travel farther at first because the pistons were retracted during service.
Pump the pedal until it feels firm before driving.
Key Takeaway: Clean rust and old lubricant first, apply only a thin film at the approved contact points, follow the vehicle’s service procedure, and restore a firm brake pedal before moving the car.
Common Brake Grease Mistakes
Small lubrication errors can create noise, binding, contamination, or damaged rubber components.
Greasing the Friction Side
This is the most serious mistake.
The pad face and rotor rely on dry friction. Grease on either surface can reduce braking force and contaminate the pad.
Using Too Much Grease
A thick layer is unnecessary.
Excess grease can squeeze toward the rotor, collect brake dust, and make inspection messy. A thin coating on the intended contact patch is enough.
Using Petroleum Grease on Rubber Components
Petroleum-based grease may damage certain boots or seals.
Use a lubricant whose label states that it is compatible with the rubber or plastic parts in that location.
Greasing Over Rust
Brake grease does not repair a corroded bracket.
Rust under an abutment clip can pinch the pad ears and stop the pad from sliding. Clean the bracket surface before adding fresh hardware and lubricant.
Greasing Every Shim Automatically
Pad shims vary.
Some pads are engineered to operate without grease between the pad and shim. Others have instructions that call for lubricant at a specific interface.
Read the instructions supplied with the pads rather than copying a generic method.
Key Takeaway: The main mistakes are contaminating friction surfaces, using too much grease, choosing an incompatible lubricant, covering rust instead of removing it, and ignoring pad-specific shim instructions.
Does Brake Grease Stop Squeaking?
Brake grease can reduce squeal when the noise comes from vibration at pad-to-caliper or hardware contact points.
It cannot fix every brake noise.
When Lubrication May Reduce Noise
Lubricant may reduce vibration where:
- Pad tabs contact abutment clips
- A caliper piston contacts the back of an approved pad or shim
- Outer caliper fingers touch the pad backing
- Dry slide pins prevent smooth caliper movement
Bendix and PowerStop both describe correct lubrication as one part of brake-noise control.
When Grease Will Not Fix the Problem
Grease will not repair:
- Worn-out friction material
- Deeply scored rotors
- A seized caliper
- Bent or damaged hardware
- Cracked pads
- A failing wheel bearing
- Incorrect pad fitment
- Severe rotor runout or thickness problems
If brakes continue to squeal after a pad job, inspect the mechanical cause instead of adding more grease.
Key Takeaway: Brake grease can damp vibration at selected contact points, but squeal caused by wear, rotor damage, bad hardware, or a seized caliper needs a mechanical repair.
What Should You Do if Grease Gets on the Pad or Rotor?
Stop assembly and clean the contamination before the vehicle is driven.
A rotor with a small amount of suitable surface grease can usually be cleaned thoroughly with brake cleaner and a clean lint-free cloth.
A brake pad is different because friction material can absorb contaminants. AutoZone states that heavily oil- or grease-contaminated pads should be replaced rather than treated as normal surface dirt.
If only a tiny accidental smear touched the pad during installation, follow the brake-pad maker’s guidance. Do not assume spraying cleaner onto the pad automatically restores it.
If there is any doubt after heavy contamination, replacing the affected axle set is safer than relying on a compromised friction surface.
Conclusion
The answer to where to put grease on brake pads is limited to the non-friction contact points: pad ears or tabs, abutment-clip interfaces, approved piston or caliper-finger contact areas on the backing plate, and the related caliper slide pins with the correct lubricant.
Keep all grease away from the friction material and rotor face. Use only a thin film, remove corrosion before lubrication, and choose a brake-specific product that matches the metal, rubber, or plastic parts it will touch.
I would also check the instructions supplied with the exact brake pads before greasing the backing plate or shims. Modern shim designs differ, and some are intended to work dry.
Correct lubrication is a small part of a brake job, but it should be precise. If the caliper is sticking, the rotor is damaged, the pads are contaminated, or the hardware is badly corroded, grease alone is not the repair.
FAQs About Greasing Brake Pads
Do You Put Grease on the Back of Brake Pads?
Sometimes. A small amount may be applied where the caliper piston or outer caliper fingers touch the pad backing plate or approved shim.
Some pad makers use multilayer or bonded shims that do not need added lubricant. Check the instructions for the exact pad set before coating the back.
Do You Grease Brake Pad Clips?
A thin film of brake lubricant is commonly applied at the contact areas where the pad tabs slide on the abutment clips.
Clean rust from the bracket before installing the clips. Do not pack the clips with grease, and keep lubricant away from the rotor and friction material.
Should You Grease Caliper Slide Pins?
Yes, on floating-caliper designs that use lubricated slide pins, but use a brake lubricant that is compatible with the pin boots and bushings.
Clean the pins first and inspect them for rust or pitting. A damaged pin should be replaced rather than covered with fresh grease.
Can You Put Too Much Grease on Brake Pads?
Yes. Thick grease can squeeze out, attract debris, and migrate toward areas that must remain dry.
Use a thin coating only on the actual sliding or contact surfaces. If grease is visibly packed around the pad or clip, there is probably more than the job requires.
Can You Use Regular Grease on Brake Pads?
Do not use ordinary general-purpose grease unless the vehicle or component maker specifically approves it.
Brake components see heat and contain rubber or plastic parts that may react badly with the wrong lubricant. Use a product clearly labeled for brake-system service.
Should Brake Pad Friction Material Be Greased?
No. The friction material must remain clean and dry because it needs friction against the rotor to slow the vehicle.
Grease on the friction face can reduce braking and contaminate the pad. Heavy contamination is a reason to replace the affected pads.
Does Brake Grease Go Between the Pad and Shim?
It depends on the pad and shim design.
Some manufacturers call for lubricant at that interface, while others specifically design their shims to work without it. Follow the instructions for the exact brake pad rather than treating every shim the same.